Salesforce has grown from a basic customer relationship management (CRM) solution to a comprehensive suite of tools enabling businesses to manage marketing campaigns, generate qualified leads, and more. At the same time, Salesforce processes large volumes of business-critical data daily, and data availability is essential to an organization's effective sales and marketing operations.
A formal data retention policy ensures the organization stores relevant and valuable data, optimizing performance and cost while maintaining regulatory compliance and data security. However, accidental misplacement of records or inadvertent deletion of data can disrupt your workflow and also cause compliance risk. And without a clear recovery plan, you might find yourself in a more complicated situation.
Thankfully, Salesforce allows users to restore lost records in several ways, such as from Recycle Bin backups, weekly backups, and even an entire organization. However, the first step involves understanding when Salesforce restores deleted records due to the limitation on the duration for which deleted records are stored.
In this article, we'll walk you through a structured methodology to enable Salesforce restore deleted records correctly, along with important factors that you need to take into consideration during the recovery process.
Initial Troubleshooting
Before proceeding with the data recovery process, follow the steps below to confirm the deletion of records.
Verify Record Existence
Begin by verifying if the records have been transferred to another user, making them inaccessible to you. To verify the existence of records, you can approach a system administrator or a user with ‘View All Data on the object’’ permission. They will be able to find the record through search and confirm if it exists even though your access may have ceased.
Alternate Method
If you have been looking for records in a related list, you can use Global Search to discover them. If the records appear in the search results, this could indicate that they were reparented, indicating their relationship to the expected related list has changed.
Review Sharing Rules
Another possible cause of missing records is changes to the organization's sharing rules, which determine users' access to specific records. Make sure to verify with your Salesforce administrator if any changes have been made to the sharing rules that would affect your visibility in the records.
After you have verified and confirmed the deletion of records, you can proceed with the recovery process.
Data Backup
After verifying and confirming the deletion of records, you can proceed with the recovery process. The following steps will help you determine if the records are available for recovery through other means.
Search and Restore from the Recycle Bin
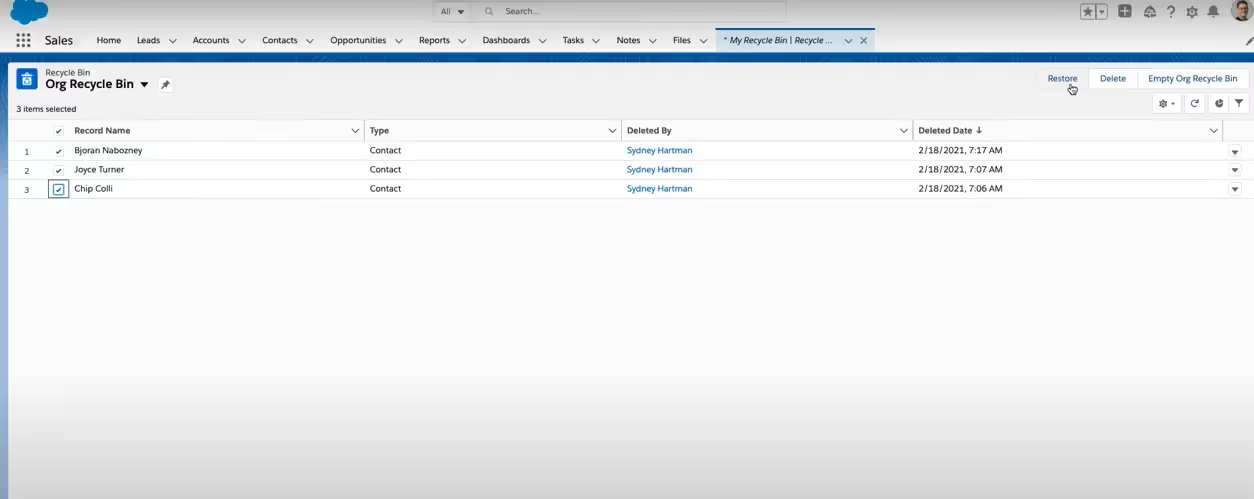
Access the Recycle Bin in Salesforce and set the view to “All Recycle Bin” to view deleted records and search for missing ones. You can use the search function or sort the records manually to locate missing data.
If you find the records in the Recycle Bin, select them and click restore.
On the other hand, if there are too many records for restoration, the manual method can be time-consuming. In this case, you can leverage Workbench and restore multiple records that are in the Recycle Bin.
Check Deleted Records Using Data Loader
If the records do not exist in the Recycle Bin, you can try querying them with Data Loader using the condition: isDeleted = True.
These records can be exported and recreated.
Additionally, you can ask a system administrator or User with API access and View All Data on the object permissions to check deleted records using Data Loader’s Export All function. When records are purged from the Recycle Bin, they might still be visible through API to Users with View All Data and API access using the data loader until the records are entirely purged from the organization.
Review Related Parent Records
Sometimes, the deleted record could be a child record that was deleted because the parent record was deleted. If this is the case, find the parent record in the Recycle Bin and restore it to automatically recover the child records.
Utilize Data Backups
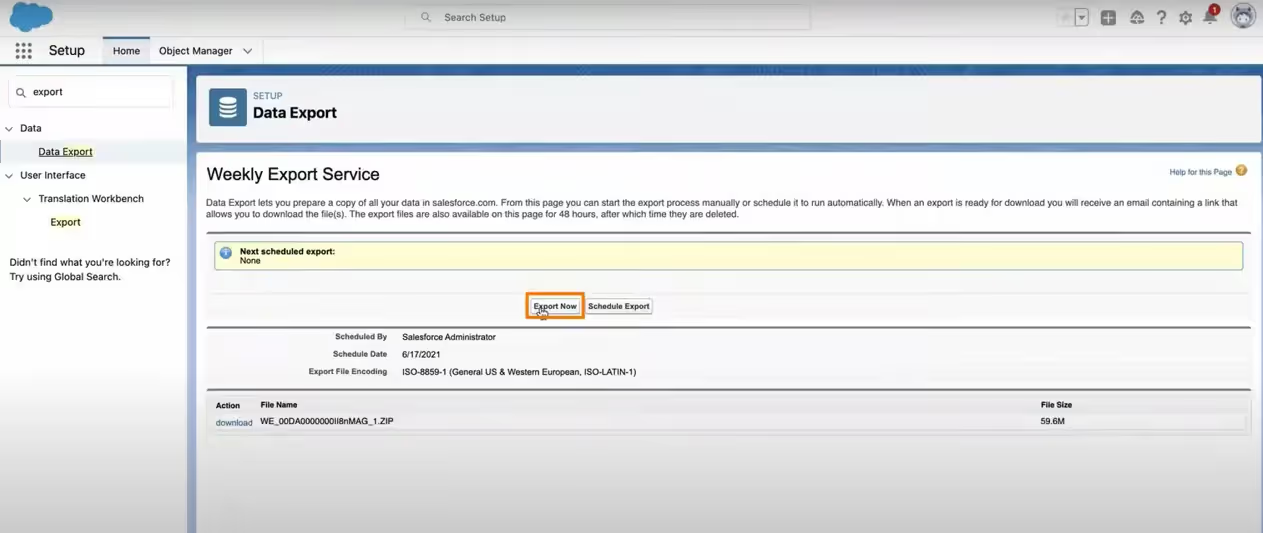
Salesforce has a built-in weekly data export, enabling organizations to take weekly data backups. You can contact your system administrator to determine if a Data Export has been performed recently(either with Salesforce data backup or third-party backup solutions from AppExchange.)
If you can find the deleted records within an export backup, then the information can be used to recreate the records in the organization.
Review Full Sandboxes
You must check with your system administrator if a Full Sandbox was recently created or refreshed.
Full Sandboxes copy all data that existed in the production organization when the sandbox was created unless specific objects were excluded. If deleted records exist in a recent sandbox copy, export them using tools like Data Loader or an API tool and recreate them in production.
How to Recreate the Data?
After you have found the backup of missing records or data, you can recreate them using one of the methods of importing data. However, you must be aware of some considerations while recreating the data to ensure data integrity and relationships.
Understand Record IDs and Relationships
When records are recreated in Salesforce, they are assigned new unique record IDs. It is important to take this in account when restoring data related to other records.
For instance, if you are restoring an Account and its related Contact records, you must first recreate the Account. After obtaining the new Account ID, update your Contact recovery file to replace the old Account ID with the new one before restoring the Contact records.
Update Relationships Using External Tools
Mapping old Record IDs to new ones is crucial. To do this, you need to use external tools like Excel’s VLOOKUP function to map old record IDs to their new record IDs.
Alternatively, an administrator can create a custom External ID field in Salesforce to store the original record IDs and use it to relate records to one another upon re-import.
Retain Historical Metadata
It is important to enable Salesforce’s Create Audit Fields feature if you wish to retain this historical information when your file includes:
- CreatedByID
- CreatedDate
- LastModifiedID
- LastModifiedDate
This allows you to recreate records while preserving their original creation and modification metadata.
Recovering from the Recycle Bin
Salesforce recovers deleted records from the recycle bin efficiently. Some key characteristics of this process are as follows.
Recovery in Default Retention Period
Salesforce retains deleted records in the recycle bin for 15 days by default, but this may vary depending on the retention period's customization. During the default retention period, administrators can easily recover the deleted records from the recycle bin.
Recovery After Default Retention Period
Deleted records are permanently deleted from the recycle bin after 15 days or the customized retention period defined by the individual organization. After 15 days of deletion, the administrator will have to request Salesforce to retrieve the deleted records.
Recycle Bin Emptied Before 15 Days
If the recycle bin is emptied before the 15-day limit, recovery may not be possible. In such cases, and you will have to resort to alternative restoration methods, such as
Considerations for Restoring Records from the Recycle Bin
When restoring records from the Recycle bin, you must consider the following points.
User Permissions
The right to restore records from the Recycle Bin is limited to users with the "Modify All Data" permission. On the other hand, regular users can only restore the records they have deleted.
Deleted Records Visibility
Regular users' visibility of deleted records is limited to their own records. In contrast, administrators and users with higher levels of permissions can view deleted records from all users in the organization.
Retention Period
Deleted records are retained in the Recycle Bin for approximately 15 days, even though administrators may customize the retention period in some Salesforce editions, such as Unlimited and Enterprise.
After the retention period, deleted records can not be recovered through the Recycle Bin, and administrators need to request Salesforce for records retrieval.
Deleted Records Restoration
Users can access the recycle bin through the App launcher or their homepage. Depending on their permissions, they can navigate to the recycle bin and change the view to "My Recycle Bin" or "All Recycle Bin." Next, select the record and click "Restore" to restore it to Salesforce.org.

Data Integrity and Relationships
Salesforce will restore record associations that have not been altered since deletion. However, if record associations have changed since deletions, those associations may not be restored correctly.
Once records are permanently deleted after the retention period, Salesforce administrators will have limited recovery options from the recycle bin. In this case, you will have to rely on data backup solutions or other recovery methods to retrieve deleted records.
Recovering from Weekly Backups
The Salesforce platform takes weekly backups of all objects, including account, contact, lead, and contract data, providing an additional option for recovering recently deleted records.
Using the Salesforce Data Recovery Tool, users (and their organizations) can restore their backup data in periods ranging from seven days to up to six months.

Access the Weekly Backup Files
Contact your Salesforce administrator to confirm if Weekly export has been performed recently. Download the backup files, usually a set of CSV files containing your organization data, for the desired timeframe for which you want to restore the deleted records.
Locate the Deleted Records
Open the relevant CSV files corresponding to the object(s) you want to recover (e.g., Accounts, Contacts, Opportunities) and search for the deleted records using identifying details.
Make sure to verify the record's relationship with other objects and ensure the CSV file containing the deleted records is properly formatted for restoring into Salesforce.
Import Records into Salesforce
Use the Data Loader tool or a similar data import tool to upload the data.
First, import the parent objects file to generate new record IDs and update the child objects recovery file to update the related parental association before importing the data.
After importing deleted records into Salesforce, confirm the records have been restored correctly.
Organization Restore
When weekly backups are no longer available, Salesforce Enterprise clients can request an ‘Organization Restore.’ In such cases, Salesforce will enlist a team of engineers to pull up the most recent backup of the desired organization.
While Organization Restore functions are expensive – reputedly costing more than data recovery itself – they are often the only viable option for enterprise users who cannot access Salesforce backups for any number of reasons.
Salesforce Restore Manager
Organizations can use Salesforce Release Management, Data Backup and Recovery, and Security Solutions to help them recover deleted records in Salesforce. These solutions are often equipped with Salesforce Restore Manager, enabling users to restore and archive Salesforce records and metadata.
With Salesforce Restore Manager, users can quickly and easily restore lost records and view a comprehensive history of their restore and archive operations. As it often includes features such as data recovery, backup scheduling, and the ability to access backups stored on SharePoint, Salesforce Restore Manager provides an invaluable resource for users looking to keep their data secure.
Furthermore, recovering lost records in Salesforce is time-sensitive, so users should act quickly. Once recycle bin backups become unusable, users must turn to their weekly backups or organization restore services to regain access to deleted records. Fortunately, release managers, data backup and recovery services, and security solutions are all available to help ensure enterprise users can restore lost records in Salesforce quickly and easily.
Restore Deleted Objects Using Salesforce Data Loader
Data Loader is a client application for the bulk import or export of data, which you can use to insert, update, delete, or export Salesforce records. You can use Data Loader in two different ways:
- In the first method, you can specify configuration parameters and CSV files used for import and export through the user interface. You can define field mappings that map field names in your import file to field names in Salesforce through the user-friendly interface.
- In the second method, you can use the command line in the Windows system to specify the configuration, data sources, mappings, and actions in files to set up the Data Loader for automated processing.
You can restore deleted records, which requires access to the backup data. The backup files are usually a set of CSV files that contain the unique identifier, which is the Salesforce ID of the records you want to restore.

To restore the deleted objects, follow the steps below.
Select the Object Type
You log into the Data Loader with your Salesforce credentials; no additional signups or security tokens are required.
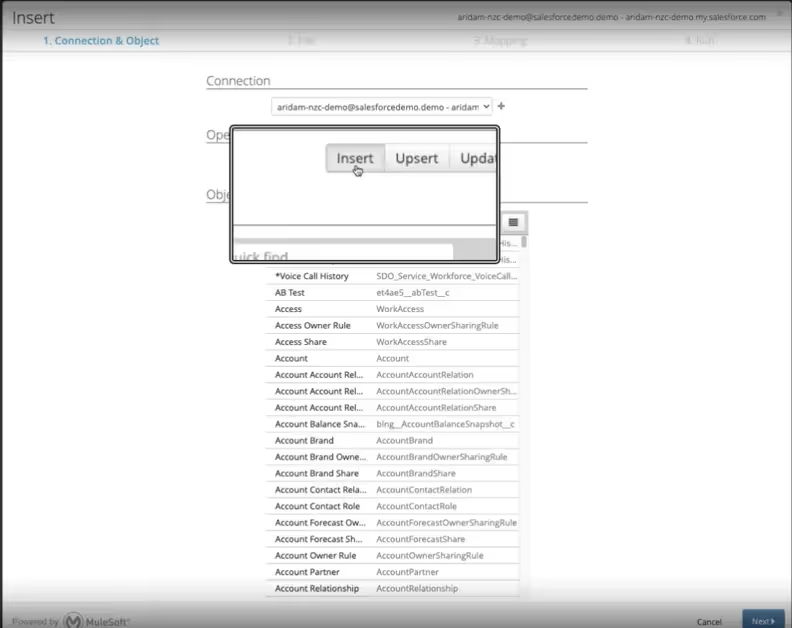
You need to import data into Salesforce so you can accordingly select a desired operation such as insert, upsert, or update. Now, choose the "Insert" operation if you are restoring records that were deleted but not permanently removed from Salesforce. You need appropriate permissions to perform insert operations on the selected object type.
The data loader dynamically populates the range of supported objects from your Salesforce Organization. You can select the object type you are restoring, such as Account, Contact, etc.
Map Fields
You can use one of the five out-of-box connectors to connect to CSV files. You must click "Browse" to locate and select your CSV file containing the records to be restored. The Data Loader will prompt you to map the fields from your CSV file. Using simple object lookups, you can use intelligent data mapping to map data fields between source and target files easily.
Restore Data and Check Logs
After mapping, review your selections and click on "Finish" to start the restoration process. After completion, check the success and error log files generated by the Data Loader. The log files provide information on successfully restored records and issues with records that couldn't be restored.
Restore Deleted Objects With Third-party Backup
If you are using a third-party backup solution, such as Flosum, follow these steps
Select Organization and Object Type
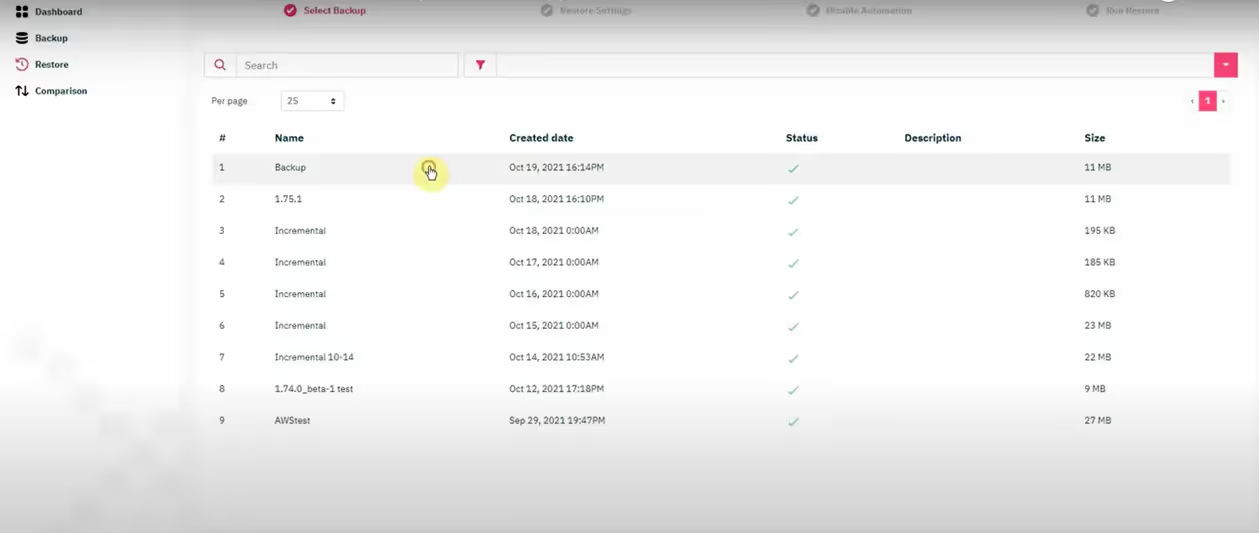
The person with admin credentials for third-party backup solutions has the right to restore deleted objects with those solutions. The admin navigates to the archives or backup section where Salesforce data backups are stored.
Additionally, the admins select the specific Salesforce organization and object type from which they want to restore records. The admin then identifies and selects the relevant backup snapshot that contains the deleted records that need to be restored.
Select Records for Restoration
The admin selects the records to be recreated. Tools such as Flosum enable organizations to recreate one or multiple records at once.

Select Restore Options
The restore options include creating new records, overwriting existing ones, or skipping if the record exists. The new record creation option creates new entries regardless of whether they exist in Salesforce. The second option, overwriting existing records, replaces existing data with the records in the backup.
When restoring deleted objects, you will select the Create new records option. After initiating restoration, assess the progress of the restoration process within the backup tool to ensure deleted objects are restored correctly.
When recreating records, ensure that all necessary fields are filled out correctly to maintain relationships between objects and data integrity. You must test restorations in a sandbox environment before performing them in production to avoid unintended data issues.
Conclusion
Recovering lost records in Salesforce is time-sensitive, so you need to act quickly. Restoring deleted records in Salesforce is crucial to maintain data integrity and ensure seamless sales and marketing operations.
The answer to the question of how to recover deleted records in Salesforce is not a one-size-fits-all solution and varies based on circumstances and organization.
Once recycle bin backups become unusable, turn to either their weekly backups or organization restore services to regain access to deleted records. Each process requires meticulous planning and execution to maintain record parental relationships and historical metadata. In addition to the Salesforce native tools, you can leverage a third-party data backup solution to restore deleted objects in Salesforce.
Our recommended Flosum’s Composite Backup, retrieves new, changed, and deleted data from Salesforce and joins it with the unchanged data already in your backup container. All of these powerful capabilities of Flosum can significantly reduce your backup and restoration time.
It also provides features such as version control and data comparison that allow users to track changes and compare data at different points in time.
Allow us to make your accidentally deleted records in the Salesforce restoration process easier. Schedule a call with our team today!
Frequently Asked Questions (FAQ)
1. Can we restore a deleted record in Salesforce?
You can restore deleted records in Salesforce within 15 days through the Recycle Bin. After 15 days, permanently deleted records can be recovered using a backup solution.
2. How do I recover deleted records?
To recover deleted records in Salesforce, you can use the Recycle Bin within 15 days of deletion. Consider using third-party backup solutions or Salesforce Data Loader to import data from backups or CSV files for records deleted beyond this period.
Thank you for subscribing


